NOTE: [12-OCT-23] This is a historical document, dating back to 2009, when we were working with Brandeis University on the LSST, now called the Vera Rubin Survey Telescope.
[25-JAN-2009] The Brandeis University High Energy Physics Departement (BNDHEP) is committed to designing and building the Timing and Control Module for the camera in the Large Synoptic Survey Telescope (LSST). At the time or writing (07-NOV-07), the LSST Camera Control System group plans to build all independent pieces of the Camera Control System around industry-standard PC104 embedded computers running Linux.
Here we keep a record of our efforts to prepare a PC104 module running an Embedded Linux System (ELS) for use in the the Camera Control System. Our entries are casual. They proceed from earliest work first, so you must scroll down for the latest work.
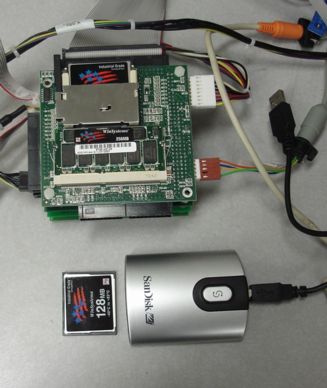
We purchased a PC104 Embedded Linux System (ELS) and development hardware from WinSystems. As shown on our purchase requisition, the computer itself is part number PCM-SC520-0M. We also purchased a digital input-output module, part number PCM-UIO48.

The computer you see in the above photograph consists of a stack of four boards and a bunch of adaptor cables. The bottom board is the PC104 mother board. The mother board holds the processor, an AMD i486, and a flash card that serves as a hard drive. The next board in the stack is the VGA graphics board, which allows us to connect a monitor and console. On top of that is our digital I/O board. The topmost of the four boards is a diagnostic board that provides numeric error codes if the computer fails during its boot sequence.
The computer comes with a flash card socket on the bottom side and a 128 MB flash card containing Winsystem's compact ELS operating system. The computer boots off the flash card and loads Linux. According to WinSystems, the flash card is a custom design that acts as a bootable hard drive when connected through its socket to the computer's IDE drive. We ordered three more flash cards from WinSystems, two of 512 MB and one of 128 MB. We connect the flash cards to our desktop Linux box with a flash to USB adaptor, as shown below. Our desktop is running Scientific Linux 2.4.21-40.
We followed Winsystem's Quick-Start Tutorial, and soon had the computer connected to the internet at address 129.64.37.40. We started up the web server, telnet server, and other utilities. You can ping the computer from anywhere on the web, or click here to connect to its home page.
To edit configuration files on the ELS computer, we had to use the vi editor. We soon became passably competent with the venerable editing program, but it's clear that we will be severely restricted in our efforst to edit, compile, and run code on the ELS computer if our only means of editing files is through an editor like vi.
[26-OCT-07] We remove the flash card from our ELS computer, plug the flash card into the card reader that came with our development kit, and plug the card reader into our Linux desktop. The green light on the reader turns on. Nothing happens on the Linux desktop. We plug the card reader in again. The green light does not turn on. We re-started the computer and the green light turned on when we plugged in the card reader. We later find that unplugging the card reader, waiting for five minutes, and plugging the card reader in again, causes the light to turn on.
Despite the shining green light, nothing appears on the Linux desktop. We tried the mount utility. Sometimes we could mount the disk as the root user, but we could not write to it.
You can see the flash card reader in the photograph above. Our Linux PC runs some version of Red Hat Linux. We can't figure out yet how to determine the operating system version.
We run Linux's fdisk utility. We can run fdisk as any user, but it won't do anything unless you run it as root user. Our fdisk is in /sbin, which is not in our default path, so we run it by giving it's full name. Here's the output from fdisk when we pass it the -l option on one of those occasions when the green light on the reader is illuminated.
Disk /dev/sda: 131 MB, 131334144 bytes
8 heads, 32 sectors/track, 1002 cylinders
Units = cylinders of 256 * 512 = 131072 bytes

   Device Boot    Start       End    Blocks   Id  System
/dev/sda1             1       980    125424   83  Linux

Disk /dev/hda: 163.9 GB, 163928604672 bytes
255 heads, 63 sectors/track, 19929 cylinders
Units = cylinders of 16065 * 512 = 8225280 bytes

   Device Boot    Start       End    Blocks   Id  System
/dev/hda1             1      1275  10241406    5  Extended
/dev/hda2          1276     19929 149838255   83  Linux
/dev/hda5   *         1       653   5245159+  83  Linux
/dev/hda6           654       784   1052226   82  Linux swap
/dev/hda7           785       915   1052226   83  Linux
/dev/hda8           916      1046   1052226   83  Linux
The first disk fdisk reports upon is our flash card. Linux has given the flash card the name /dev/sda. The /dev/sda device has one partition, which Linux has called /dev/sda1. The main hard drive, meanwhile, is /dev/hda with eight partitions /dev/hda1 to /dev/hda8.
We try to mount /dev/sda1 partition on the flash card with the mount command. As root user, this works, but as another user, it does not. To get the mount to work properly, we edit the /etc/fstab file. This file is a text file that tells Linux how to respond to requests from users to mount new devices. Here is our enhanced fstab file. We add the last four lines to allow users to mount USB devices like the card reader.
LABEL=/     /          ext3    defaults        1 1
none        /dev/pts   devpts  gid=5,mode=620  0 0
none        /proc      proc    defaults        0 0
none        /dev/shm   tmpfs   defaults        0 0
LABEL=/tmp  /tmp       ext3    defaults        1 2
LABEL=/var  /var       ext3    defaults        1 2
LABEL=/home /home      ext3    defaults,rw     1 2
/dev/hda6   swap       swap    defaults        0 0
/dev/cdrom  /mnt/cdrom udf,iso9660 noauto,owner,kudzu,ro 0 0
/dev/sda1   /mnt/sda1  auto  auto,rw,user,exec,async 0 0
/dev/sda2   /mnt/sda2  auto  auto,rw,user,exec,async 0 0
/dev/sdb1   /mnt/sdb1  auto  auto,rw,user,exec,async 0 0
/dev/sdb2   /mnt/sdb2  auto  auto,rw,user,exec,async 0 0
The fourth line from the bottom tells Linux how to handle requests to mount a device /dev/sda1. We instruct Linux to make the contents of /dev/sda1 appear in the /mnt/sda1 directory, which we create ourselves. The /mnt/sda1 directory is th mount point for the sda1 device. We created this directory ourselves. The word "auto" in the third column tells Linux to detect automatically the file system that exists on the device. The final sequence of words, separated by commas, are the mount options. These are "auto" to say the device should be mounted automatically after a re-boot, "rw" to mount it as read-write, "user" to allow any user to mount and unmount the device, "exec" to allow us to execute binary code on the device, "async" allows the operating system to write changes to the device whenever it is convenient. Because we mount with the "async" option, we must unmount the disk before we unplug it. The zero in the fifth column tells Linux's back utility, which is called dump, not to back up this device. The zero in the sixth column tells Linux's disk-checking utility, which is called fsck, not to check this device.
We can now mount sda1 with the following command when logged in as any user.
mount /dev/sda1
The device appears as an icon named "sda1" on our Linux desktop. We can unmount it from a terminal with the following command, provided that no terminal or window is using the device.
umount /dev/sda1
We have not figured out yet how to get the flash drive to mount automatically when we plug it in. Nor do we understand why sometimes the computer refuses to notice the flash drive for five minutes. When the green light is off, fdisk lists no information about the drive.
We unplug our card reader and plug another USB memory stick in its place. Linux names the stick /dev/sdb. We unplug it an try another memory stick. Now fdisk reports the following about the new memory stick.
Disk /dev/sdc: 128 MB, 128450048 bytes
8 heads, 32 sectors/track, 979 cylinders
Units = cylinders of 256 * 512 = 131072 bytes

Device Boot    Start   End    Blocks   Id  System
/dev/sdc1      1       979    125263+   6  FAT16
We can't mount this drive with our existing fstab file entries. We need an entry for /dev/sdc1. We unplug the memory stick without mounting it, and go back to our original ELS flash device. The green light does not turn on. We wait five minutes and plug the device in again. The green light comes on and fdisk tells us that device /dev/sda1 is available to mount.
As an ordinary user on our Linux desktop, we find that we cannot write to the ELS flash drive. The drive always comes up as owned by "root". Our memory sticks come up as being owned by whoever mounted them ("hashemi" or "root"). Meanwhile, when we plug the ELS flash drive into our ELS computer, we can read and write to it as the "admin" user. We have no explanation for this behavior.
We consulted two Linux experts in the ATLAS collaboration. They tell us we have done what we can to make it easy to mount flash devices. One of them says, "Linux's philosophy is: if you do not know how to access the USB stick, you are not worthy of accessing it ;-)"
Meanwhile, we can plug any of our USB sticks into any Windows or MacOS computer and see them pop up on the desktop or in the file browser, regardless of how many times we have plugged them in and taken them out again.
[09-NOV-07] The flash card in our ELS computer acts as its hard drive. We call it the flash disk. We have only one copy of the ELS operating system, and this copy exists upon the 128 MB flash disk that came plugged with the computer. We bought extra flash cards compatible with our PC104 from WinSystems: 1×128 MB and 2×512 MB. Today we set out to make a copy of our existing ELS flash disk on our new, blank 128 MB flash card.
The method we arrive upon after a couple of hours of work is to use the Linux dd utility. First we plug the flash card we want to copy in our card reader and connect it to our Linux desktop. We do not mount the flash disk before we use dd.
The flash card appears to fdisk as device /dev/sda. We are drop the number after "sda". The entire flash card, including its partition table and all its partitions, appear in fdisk as /dev/sda. The first partition (and the only partition in this case) appears as /dev/sda1.
To make duplicate our flash card, we copy its entire contents including the partition table. The dd utility (we think dd stands for disk duplicate) reads bytes from a device or file and writes them to another device or file. We log in as root. We cannot read from or write to the /dev/sda device unless we are the root user. We copy the contents of our flash card we use the following command.
[root]# dd if=/dev/sda of=sda.image
The contents of the flash card are copied into the sda.image file. We unplug the flash card. We don't have to unmount the flash card because we never mounted it in the first place. We don't have to mount the disk in the file system for dd to be able to read bytes out of the disk.
We plug in another 128 MB flash card. It can be blank or filled with other stuff. Whatever is on there will be wiped out by the following command, and replaced by the contents of our original flash card. Once again, we must be logged in as root to execute our dd command on /dev/sda, and it's important that you have not mounted the /dev/sda1 partition in the file system, or else Linux will get confused and may fail to perform the copy properly.
[root]# dd of=/dev/sda if=sda.image
We unplug the newly-written flash card, plug it into our ELS computer, and turn on the power. The ELS computer boots up. It behaves exactly as it did with the other flash card. The webserver works, telnet works, ping works, and the account passwords are the same.
Now that we have a copy of the operating system, we can set our original aside as a backup.
[09-NOV-07] One way to work make changes to the ELS hard disk is to mount the flash disk on another computer and copy files to and from the flash card via the card reader. We mount our ELS hard disk on our Linux desktop. We find we cannot write to the disk as an ordinary user. The disk is owned by root, and protected against changes by other users. We take care of this problem by logging in as root and entering:
[root]# chmod -R 777 /dev/sda1/*
Now everything on the disk is readable and writeable by anyone. We copy this web page to the www user home directory and see what happens.
The transfer almost works. We have some conflicts with protection settings so that the pages don't load properly. After we change the protection on all the files with the following line, the website works fine, including images.
cd ../www
chmod -R 666 *.*
Another way to move files to and from the flash disk is by ftp. We connected to the ftp server on the ELS computer and copied the same files into the webserver directory. Before we copied the files, we set their protections so that everyone has read and write privelidge, but nobody has execute privelidge. The directories, on the other hand, we set so that everybody has execute and read privelidge.
With the privelidges set properly on the originating computer, the website on the ELS computer works correctly immediately after ftp transfer.
[17-JAN-08] We previously created a backup of our ELS flash disk with the dd utility. Now we create a new bootable flash disk by formatting a new flash card with fdisk, installing a file system with mke2fs and tune2fs, copying files to the flash card from our Linux desktop, and making the card bootable with the grub utility. In doing so, we are following the instructions provided by WinSystems in their Creating WinSystems ELS-2.0 instructions, and we are grateful to George Hilliard of WinSystems for his support and patience with our many questions.
To begin with, we mount out 256-MByte ELS flash disk (the copy we made with dd of the original) on our Linux desktop and copy all files to a folder called ELS. We use the -a copy option (equivalent to -dpR) copy folders recursively, and to preserve links, mode, ownership, and timestamps.
[root]# mount /dev/sda1
[root]# cp -a /mnt/sda1/* ELS
These are the files we will copy to our new flash disk when it's ready.
We plug a new 512-MByte flash card into our card reader and plug the card reader into a USB socket on our Linux desktop. We run fdisk to create a primary partition on the disk as follows. A primary partition is one that leaves space at the beginning for a boot sector that will contain the master boot record. We create the master boot record later.
$ su
Password:
[root]# /sbin/fdisk /dev/sda

Command (m for help): h
h: unknown command
Command action
   a   toggle a bootable flag
   b   edit bsd disklabel
   c   toggle the dos compatibility flag
   d   delete a partition
   l   list known partition types
   m   print this menu
   n   add a new partition
   o   create a new empty DOS partition table
   p   print the partition table
   q   quit without saving changes
   s   create a new empty Sun disklabel
   t   change a partition's system id
   u   change display/entry units
   v   verify the partition table
   w   write table to disk and exit
   x   extra functionality (experts only)

Command (m for help): p

Disk /dev/sda: 526 MB, 526417920 bytes
16 heads, 63 sectors/track, 1020 cylinders
Units = cylinders of 1008 * 512 = 516096 bytes

   Device Boot    Start       End    Blocks   Id  System
/dev/sda1   *         1      1019    513544+   6  FAT16

Command (m for help): d
Selected partition 1

Command (m for help): n
Command action
   e   extended
   p   primary partition (1-4)
p
Partition number (1-4): 1
First cylinder (1-1020, default 1): 1
Last cylinder or +size or +sizeM or +sizeK (1-1020, default 1020): 1020

Command (m for help): p

Disk /dev/sda: 526 MB, 526417920 bytes
16 heads, 63 sectors/track, 1020 cylinders
Units = cylinders of 1008 * 512 = 516096 bytes

   Device Boot    Start       End    Blocks   Id  System
/dev/sda1             1      1020    514048+  83  Linux

Command (m for help): w
The partition table has been altered!

Calling ioctl() to re-read partition table.
Syncing disks.
Now we install a file system with mke2fs, which is, "a tool that allows you to create a Linux second extended (ext2) file system on any block device." The command takes a twenty seconds to complete.
[root]# /sbin/mke2fs -m0 /dev/sda1
mke2fs 1.32 (09-Nov-2002)
Filesystem label=
OS type: Linux
Block size=1024 (log=0)
Fragment size=1024 (log=0)
128520 inodes, 514048 blocks
0 blocks (0.00%) reserved for the super user
First data block=1
63 block groups
8192 blocks per group, 8192 fragments per group
2040 inodes per group
Superblock backups stored on blocks:
        8193, 24577, 40961, 57345, 73729, 204801, 221185, 401409

Writing inode tables: done
Writing superblocks and filesystem accounting information: done

This filesystem will be automatically checked every 34 mounts or
180 days, whichever comes first.  Use tune2fs -c or -i to override.
As the utility recommends itself, we use tune2fs to disable mount counting and periodic file system checks.
[root]# /sbin/tune2fs -c0 -i0 /dev/sda1
tune2fs 1.32 (09-Nov-2002)
Setting maximal mount count to -1
Setting interval between check 0 seconds
We mount the flash drive as root, and copy all our ELS files into it.
[root]# mount /dev/sda1
[root]# cp -a ELS/* /mnt/sda1
Now it's time to make the drive bootable with the grub utility. We are still logged in as root, and our flash disk is still mounted. When we install grub on a drive, grub writes a short piece of code in to the flash drive's master boot record. The master boot record is small, so grub creates a directory called /boot/grub and puts the rest of the code and configuration parameters it needs in there. Among the files it puts in this directory is menu.lst, which contains instructions to grub telling it how to set up the boot option menu, and how to execute each option.
When our ELS computer boots up, it runs the master boot record code, which loads the full grub utility out of the /boot/grub directory. Now that grub is running it reads menu.lst and creates the boot menu. The user selects a boot method, say ELS-2.0. Associated with this option are a sequence of grub commands that select the boot device and the kernel file. The kernel file contains the code that starts up the operating system. We will show and explain these commands later.
Right now, we want to install grub into the master boot record of our flash card and make sure that all the necessary grub code and configuration files are on the flash card. We tried this with the /sbin/grub on our Linux desktop, but the resulting installation did not recognise the menu.lst file. It turned out that the grub on our desktop was version 0.93, while the one in ELS-2.0 is 0.95. So we run ELS/sbin/grub instead. Note that we are still logged in as root.
[root]# ELS/sbin/grub
grub> find /bin/cp
 (hd0,4)
 (hd1,0)
When we install grub on our flash card, we have to name the flash card and its partition. The grub device-naming convention differs from that of Linux. In grub, our flash card appears as a hard drive named hd1. The hard drives being numbered from zero and up. Thus hd0 is the desktop's hard drive. The way we determine our flash card name and its partition number is by telling grub to find a file we know exists on all the bootable Linux drives: the cp utility. Now we can tell grub to direct its attention to our flash card and install itself.
grub> root (hd1,0)
 Filesystem type is ext2fs, partition type 0x83
grub> setup (hd1)
 Checking if "/boot/grub/stage1" exists... yes
 Checking if "/boot/grub/stage2" exists... yes
 Checking if "/boot/grub/e2fs_stage1_5" exists... yes
 Running "embed /boot/grub/e2fs_stage1_5 (hd1)"...  16 sectors are embedded.
succeeded
 Running "install /boot/grub/stage1 (hd1) (hd1)1+16 p (hd1,0)/boot/grub/stage2
   /boot/grub/menu.lst"... succeeded
Done.
grub> quit
We unmount the flash card, plug it into our ELS computer and turn on the power. We get the grub boot menu, as defined by menu.lst. Here are the commands that boot ELS-2.0.
title  WinSystems-ELS-2.0
root (hd0,0)
kernel /boot/bzImage-2.6.10-els-2.0 root=/dev/hda1 console=tty0 console=ttyS1,38400n8
Our ELS system the kernel file is bzImage-2.6.10-els-2.0. The grub utility understands the file system on the flash card. It knows how to find a file whose name is given as a path in its kernel command. It loads the kernel into memory and executes it. When grub starts kernel, it passes parameters to the kernel as a text string. The text string is the string at the end of the kernel command.
We select the ELS-2.0 boot option and the ELS machine boots off our newly-built flash card. Everything works exactly as it did with the original 128-MByte flash card we received from WinSystems.
The entire ELS file system occupies only 13.4 MBytes on our 512-MByte flash card.
To satisfy our curiosity, we take our flash card and plug it into our ELS machine. We get a grub command line. For some reason, grub is not finding the /boot/grub/menu.lst file on the flash card.
We now try to boot off our flash disk on the desktop machine with the following grub commands, which we put in the menu.lst grub configuration file.
title WinSystems-ELS-2.0
root (hd1,0)
kernel /boot/bzImage-2.6.10-els-2.0 root=/dev/sda1 console=tty0
We re-start the desktop. A grub menu comes up. We select the ELS-2.0 kernel. The computer loads the image and starts to boot. But it gets stuck when the kernel tries to open the root device, which we say is /dev/sda1. We belive Linux cannot open the root device because it has not yet mounted the flash drive, but we are not sure that's the reason.
[13-JAN-08] We are sitting at home. Our ELS computer is running telnet and ftp servers. We cannot connect to either from home because our ELS computer is on campus, and our campus network blocks both telnet and
We connect by ssh to our webserver on campus, and connect by telnet from the webserver to our ELS computer. We now explore the commands and utilities available on the ELS computer.
| Utility | Availability |
|---|---|
| telnet | /usr/bin/telnet, /usr/bin/, /usr/sbin/vsftpd |
| ftp | /usr/bin/ftpget, /usr/bin/ftpput, /usr/sbin/telnetd |
| sftp | none |
| ssh | none |
| gcc | none |
| tclsh | none |
| bash | none |
| X Windows | none |
We will try to add a new utility to the ELS computer. It may be that C-compilers and X-windows are too large for our flash card, so let's start with the bash shell, which is not available as a separate utility in ELS.
We mount an ELS flash card on our Linux desktop. We copy the /bin/bash to /mnt/sda1/bin/bash. We fully expect the bash code to call some shared libraries, so we use the nm utility to find out what it needs.
$ nm /bin/bash
nm: /bin/bash: no symbols
We put the flash card back in our ELS computer and boot up. When we try to run bash, it says it can't run because it can't find a file called libtermcap.so.2.
We copy our own LWDAQ Software onto the flash drive. We try to run the tclsh, the TCL shell we bundle with our distribution. The shell fails, saying it can't find libtcl8.4.so. When we do the same thing on our desktop machine, the shell runs fine. It finds the libtcl8.4.so sitting in the ../lib folder. When the ELS computer says it can't find libtcl8.4.so, we suspect it really means to say that it can't find another shared library called by libtcl8.4.so, which tclsh assumes is in the kernel.
[18-JAN-08] The ELS computer contains no C-compiler. Nor does it have a copy of the kernel files necessary for compiling new drivers. We cannot compile our IO (Input-Output) programs on the ELS computer.
One solution to this problem is to install a C-compiler on the ELS machine. We would like to install GCC. We spoke to George Halliard of WinSystems. He said he has never installed a C-compiler on an ELS computer. He says the GCC compiler is too large. He suggested we build our own embedded Linux from scratch using the recently-improved Buildroot system. By this means, we could include the MicroC compiler on our embedded system. The MicroC compiler is small. We enjoyed reading this explanation of Buildroot and the problem of compiling for and on embedded Linux systems. He also recommended we look at Linux from Scratch, which gives instructions on how to build your own Linux from source code.
Not only must the C-compiler we install upon our ELS computer be small, it must also be compatible with the C libraries and compiled kernel image that make up the heart of the ELS. The Linux on our PC104 computer is based upon Simply MEPIS. Its C libraries are stripped down, as is everything else. That's why the ELS takes up only 13.4 MBytes on disk, and can run with plenty of room in the ELS computer's 256-MByte RAM.
Instead of installing a compiler on the ELS computer, WinSystems recommends we compile code for the ELS on our Linux desktop, and copy the compiled executable files to the ELS computer by ftp or by flash card. Our immediate objective is to use the PCM-UIO48 to flash some lights, and measure the maximum switching speed of its logic outputs. To compile an IO program, we must do the following.
In order to compile the driver, you have to have a copy of the expanded Linux kernel directory. Our WinSystems ELS is based upon Linux 2.6.10. We download linux-2.6.10.tar.bz2 from here and expand it. We extract the UIO48A support files from uio48io_kernel_2.6.zip supplied by WinSystems. We run make on the example programs. It compiles the driver uio48.ko. We take uio48.ko to our ELS computer. As the root user we try to load it into the kernel.
[root]# insmod uio48.ko io=0x240 irq=5
insmod: error inserting 'poll': -1 Invalid module format
After consultation with WinSystems, we conclude that we cannot build a driver for our ELS Simply-MEPIS computer using the C-compiler on our Scientific Linux desktop.
WinSystems showed us where we could download a copy of the driver that they compiled in Simply-MEPIS. We are able to load this driver in our ELS computer.
[root]# insmod uio48.ko io=0x240 irq=5
$ Id: uio48.c,v 1.1 2005/04/22 20:10:58 steve Exp $
UIO48 - IRQ 5 registered ok Chip 1
Our UIO48A is jumpered to occuby 16 bytes of address space starting at address 0x320 and to use interrupt request line 5 when changes take place on interrupt-enabled inputs. As you can see, the kernel accepts the driver.
The remaining steps go smoothly. We don't need the linux kernel to compile uio48.o from uio48.c. Nor do we need it to create the device nodes. We compile our two programs, flash and flash_fast. These both refer to uio48.h. The flash program is one supplied by WinSystems. The flash_fast program we created ourselves. It sets and clears a bit as fast as it can.
We copy our uio48a folder onto our flash drive. To copy the device nodes, we need do use the -a copy option, and we need to be root.
[root]# mkdir /mnt/sda1/usr/lib/uio48a
[root]# cp -a uio48a/* /mnt/sda1/usr/lib/uio48a
We plug the flash card into our ELS computer and boot. We cd to /usr/lib/uio48a. We re-install the uio48.ko driver. We run flash. We plug ten LEDs with 1-kΩ resistors into the first ten IO ports of the UIO48.

The programs run as they should.
It seems likely that we can compile code for our ELS computer on any desktop Linux computer, provided we link to the correct drivers. We may run into problems, however, when we try to compile TCPIP socket code on Scientific Linux and expect it to run with the greatly-reduced TCPIP stack and Ethernet driver of our Simply-MEPIS Linux. In the end, we may be better off building a copy of our embedded Linux on our desktop. Such a copy is called a toolchain. With the help of the chroot utility, we could switch our desktop from compiling within its own root file system to compiling within the toolchain's root file system.
[18-JAN-08] The ELS computer provides a 133 MHz 486 microprocessor, 256 MBytes of RAM, and we are booting it off a 512 MByte flash disk. We can't read and write indefinitely from this flash disk. If we want a scratch disk for current operations, we should make one in RAM. We transferred a large file through an Ethernet switch to our ELS computer. The fastest data rate we obtain through the switch is 4 MBytes/s.
Our flash_fast program is compiled from C. It sets and clears bits on our UIO48A board as fast as it can. The figure below shows what this switching looks like on an oscilloscope.

The switching frequency is only 90 kHz. The UIO48A Operations Manual does not tell us how fast we can expect the outputs to switch. Our experience has been, with eight-bit embedded microprocessors, that code compiled from C is ten times slower than code written in assembler. In this case, an IO write with no counter increment will take no more than twenty clock periods, or 150 ns. Ten times that would be 1.5 μs. Here we have 5 μs. It looks like the driver and the code that calls the driver are slowing down the computer by a factor of 30. We doubt very much that the UIO48A itself is responsible for the delay.
Nor can we speed up the performance of the UIO48A by reading and writing bits in parallel. The driver provides only a serial bit interface. Let us suppose, however, that we obtained a different IO board, one with a driver that could read and write 32 bits at a time, all in 5 μs. This would represent a data rate of only 800 kBytes/s, which is 5 times slower than the Ethernet transfer rate on the same computer, and 3 times slower than the data rate we obtain with the 22-MHz 8-bit embedded processor we use on our existing TCPIP data acquisition driver, the A2037E.
The only way we are going to obtain reliable, high-speed communication between the ELS computer and whatever circuit it controls is by writing drivers and low-level IO code in assembler. We are not sure how hard it is to write Linux drivers from scratch in assembler.
[18-JAN-08] Our ELS computer is fast over Ethernet but slow over its digital IO board. The Ethernet transfer rate is 4 MBytes/s. The maximum digital IO switching speed is 90 kHz. Each call to the IO device driver takes 5 μs. If we were to use one IO bit for serial data transfer, our maximum data rate would be around 20 kBytes/s. Furthermore, our data rate would be intermittent because Linux's pre-emptive multi-tasking interrupts our IO activity frequently.
Suppose our IO board accepted 32-bit data instead of 1-bit data, and suppose further that our external circuits are willing and able to make use of 320bit data transfers. The IO board would need to provide a data strobe. The maximum frequency of this strobe would be 90 kHz. Our maximum data rate would be under 400 kBytes/s, which would still be ten times slower than the Ethernet data rate.
If we want our ELS computer to communicate with external circuits at more than 1 MByte/s, we must re-write its digital IO device drivers in i486 assembler and make block data transfer available to our IO programs. Instead of taking ≈150 instructions to perform one IO cycle, a driver written in assembler would take ≈20 instructions. Our callse to these functions would provide the driver with a pointer to a block of memory. The driver would perform the block transfers with a loop written in assembler.
One of the advantages forseen by using ELS computers was that we would obtain a high-performance, low-power embedded computer with fast IO for very little effort. We spend five working days figuring out how to duplicate the ELS file system and compile IO programs on our Linux desktop that would run on the ELS computer. Now that we have put in this effort, however, we believe others trying to duplicate our efforts will make more rapid progress, even if they choose a PC104 computer form a different manufacturer. But writing drivers in asssembler ties our solution to particular hardware and will take weeks of engineering effort, if not months. Indeed, we cannot even guarantee that such an effort will be successful in the long run. Subsequent versions of Linux may be incompatible with our custom-made drivers. We may be unable to take advantage of Linux bug fixes.
Another advantage of PC104 ELS computers is that the operating system is robust and multi-tasking. We can connect over TCPIP at any time, stop IO existing processes, load new IO programs, and re-start our IO processes. We can have several IO processes running at the same time without waiting for one another. We can force a re-boot over the network without turning off the power or touching a switch.
Nevertheless, if we are to proceed with PC104 ELS computers as our control nodes in the LSST camera, we must first demonstrate that we can switch an ELS computer's digital outputs at sufficient speeds to satisfy the requirements of such boards as the Timing and Control Module. If we cannot demonstrate sufficient speed, there is no point in using ELS computers. There are other embedded options, such as the RabbitCorre modules from Rabbit Semiconductor, which we have used for years, with great satisfaction. The latest modules provide 500-kByte/s over Ethernet, and 5 MBytes/s over an eight-bit parallel interface. The modules are one tenth the size of a PC104, cost one tenth as much money ($100 instead of $1000), and consume less than half the power.
[21-JAN-08] We summarise our work, and present the problems with the ELS as a choice of control node for the LSST Camera Control System is a talk we prepared for the Camera Control Workshop in Tuscon, 21-23 January, 2008, Camera Control Nodes.